Interface Overview
Board View
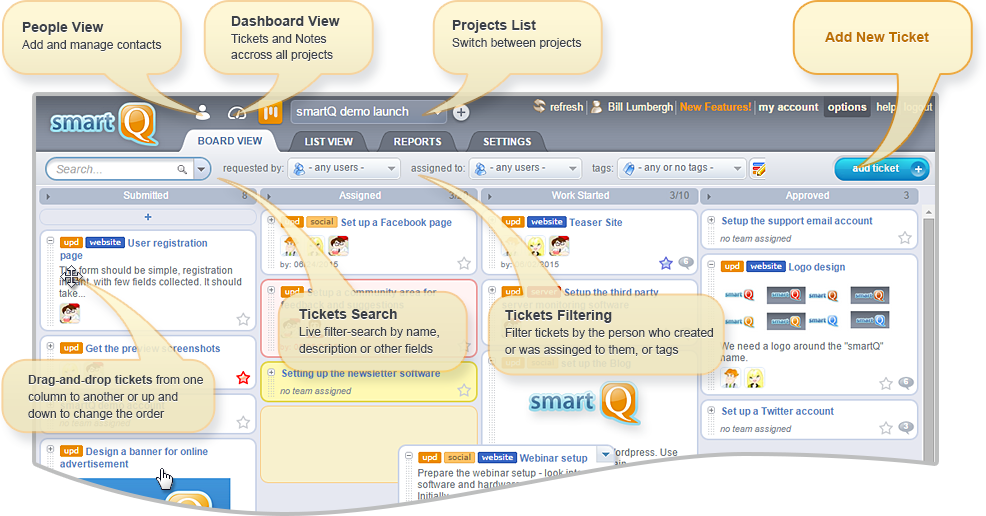
This the main screen that displays tickets placed in columns which represent steps of a defined process. You move tickets from left to right as they go through those stages, until they reach the final one.
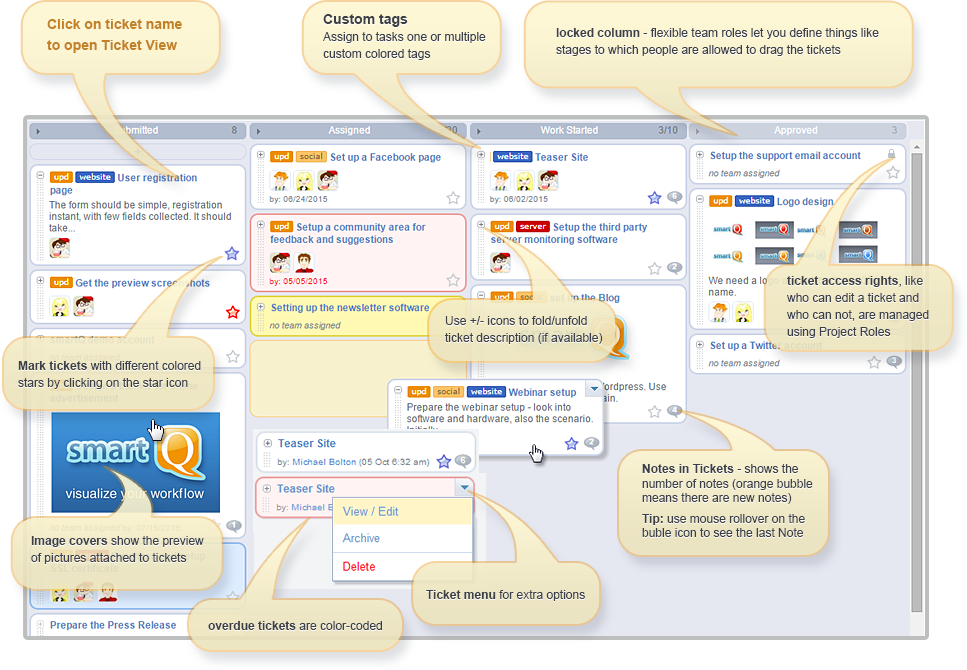
Once a ticket reaches the last column, it will be auto-archived after a few days (7 by default).
You can change that delay or turn auto-archive off via Main settings window:

You can access the archived tickets list via the List View. You can also un-archive them at any point.
Ticket View
Ticket View contains ticket details and also a Notes and Files area for communicating with your team.
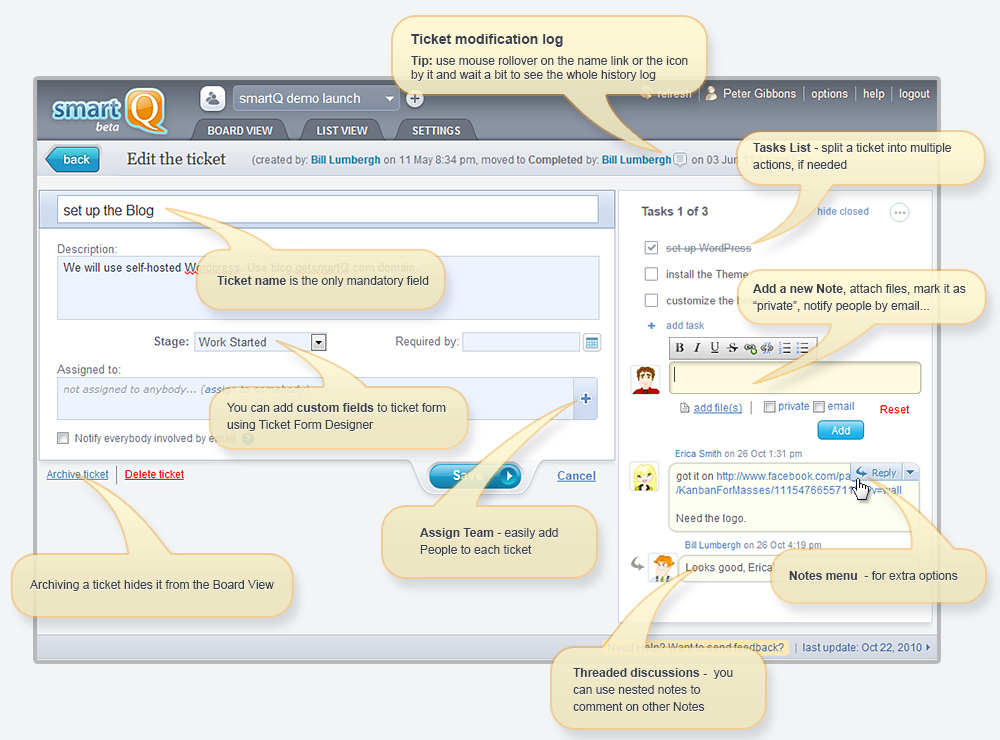
If you need to split a ticket into multiple actions, you can add a list of Tasks to it:
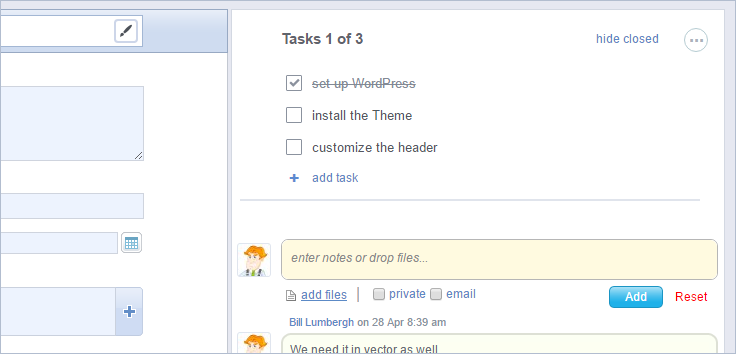
Tasks list is shared with other users and they can edit it if they have the rights to edit the ticket. Some tips:
- You can rearrange the tasks order with drag-and-drop
- Press Enter for quick task save
- You can hide closed tasks to save space
- Total number of tasks and the number of tasks completed for each ticket is displayed in Board and List views
- To add multiple tasks at the same time just type all of them together (or paste them in), each one in a separate line (use CTRL+Enter or Shift+Enter for a line break)
Note: Tasks list is not visible to External Users.
List View
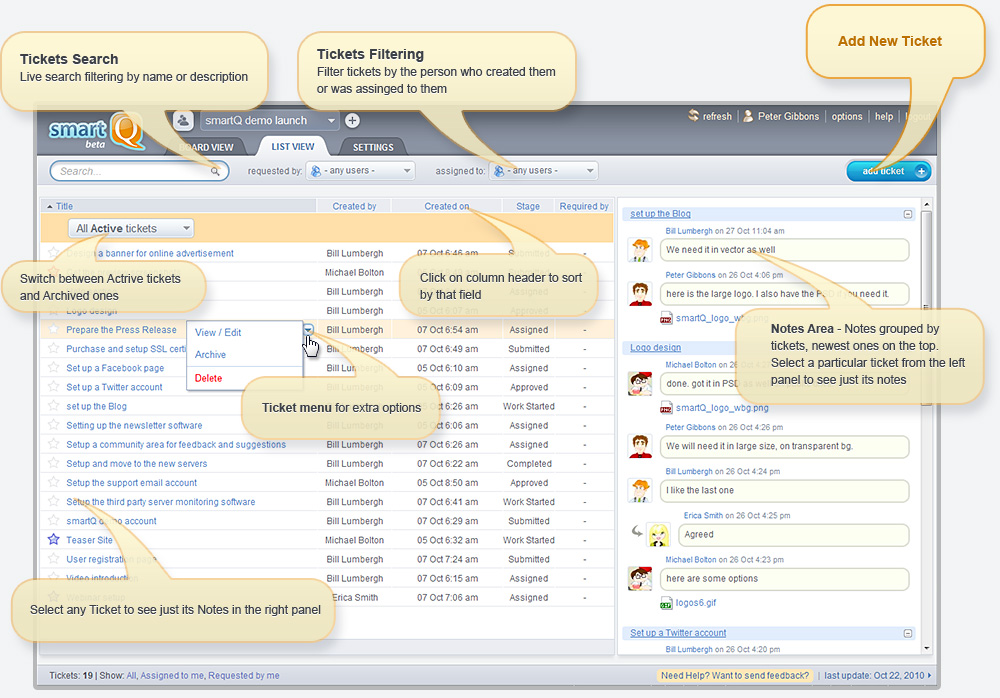
List View is an alternative to Board View and shows your tickets in a flat list style. The Notes and Files area is also included, and you can also see all the communications across all the tickets - latest on the top.
Dashboard View
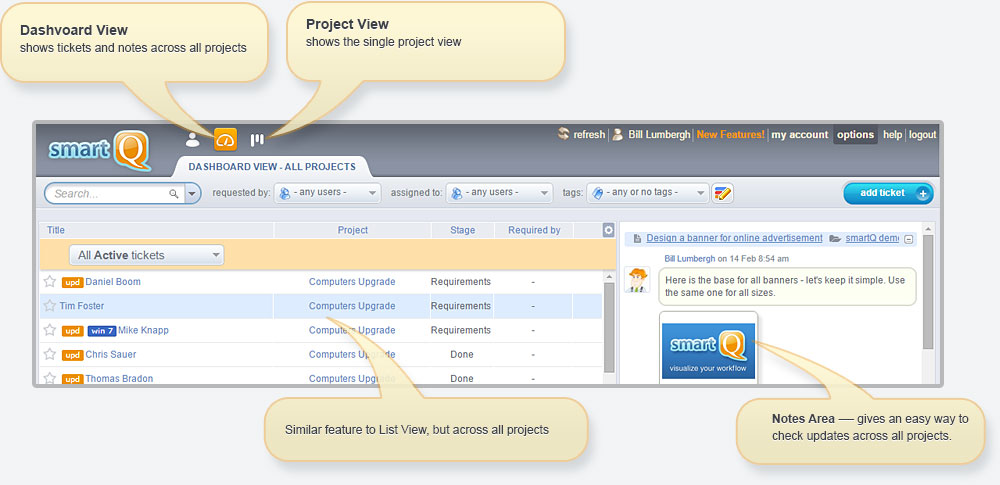
Dashboard View is similar to List View inside projects, but it shows tickets across all projects, not just one.
Project Settings — Info
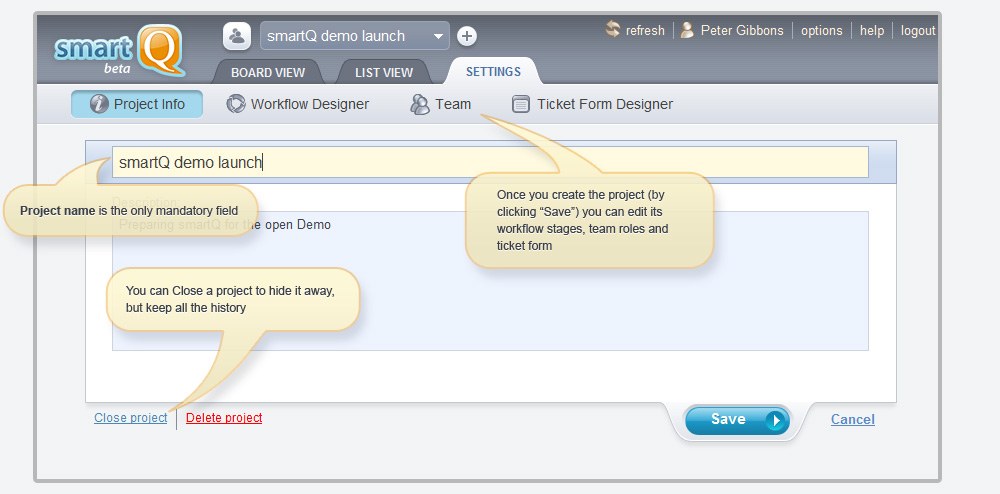
Project Info is the first of the four settings pages that let you customize each project.
Project Settings — Workflow Designer
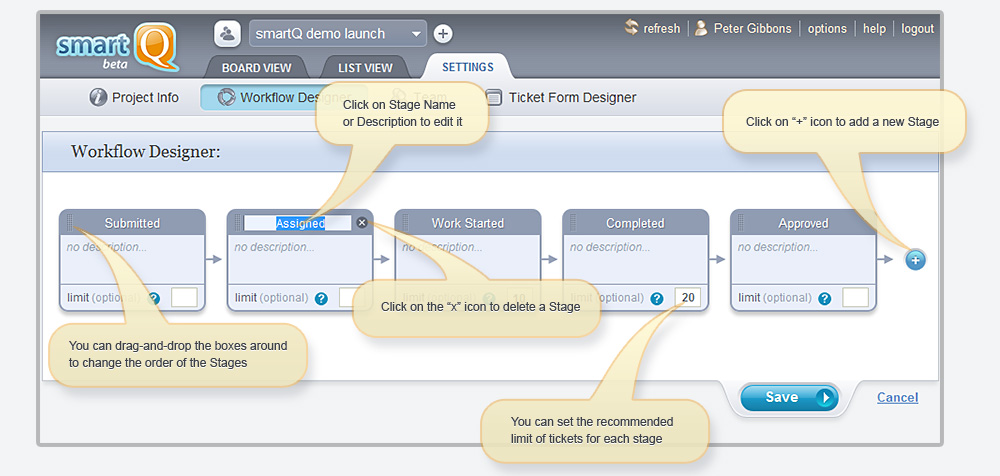
You can add and customize each stage of your workflow.
Project Settings — Team Roles
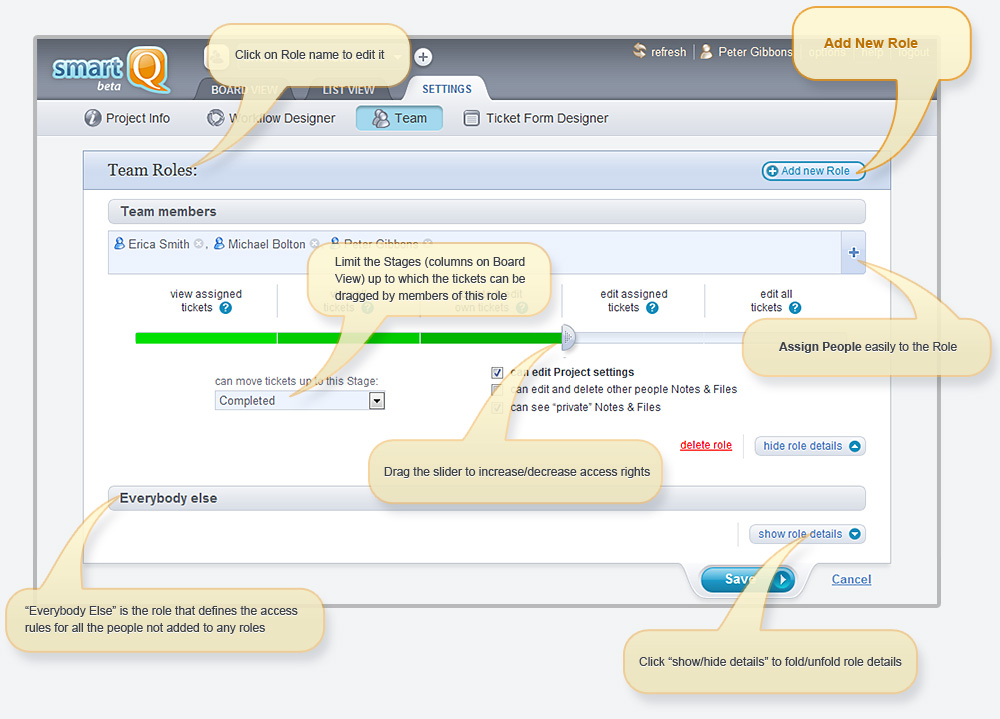
For each project you can define the Team Roles, assign people to them, and define their access rights. You can even define default access rights that will apply to all the other people that are not included in any roles.
Project Settings — Ticket Form Designer
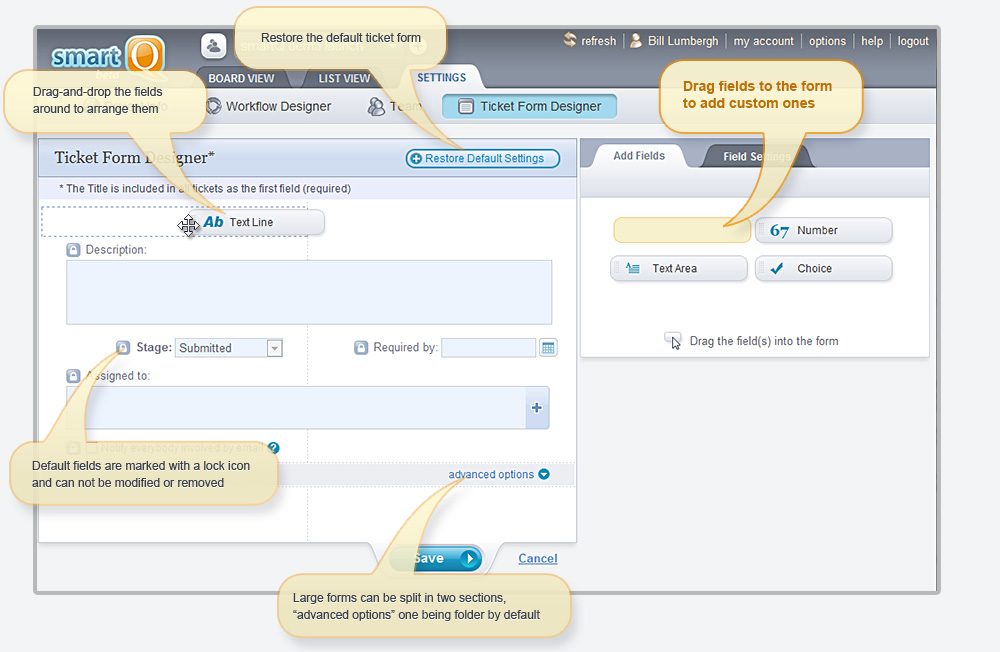
You can add custom fields to your tickets, re-arrange them, define the required ones, list the choices and the default values and more!
Deadline Reminders
You can enable Deadline Reminders via the "Settings/Personal" screen:

When enabled, Deadline Reminders will send you emails notifications with the list of your tickets (assigned to you) that have their deadlines approaching and the ones that are overdue.
You can customize on which days and at what hour you want the emails generated and how long in advance of a deadline.
Your Deadline Reminders are also displayed in the Notification Center.
Project Settings — Automation
Automation allows you to create a set of rules for each project. Each rule is a pair of a condition and an action — when a ticket fits the condition, it triggers the action.
With Automation you can trigger email notifications on certain conditions, track tickets that are being ignored, color them or assign to people, and so on.
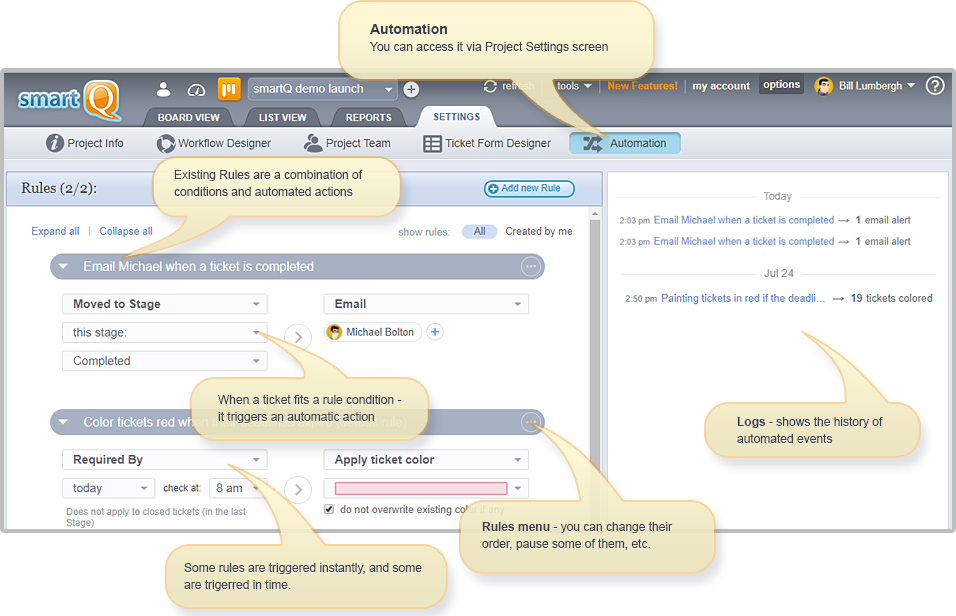
By default, each project has one default Rule — coloring red tickets with expired deadlines. You can add/edit/delete rules, change their order and pause them. When a rule can not be triggered due to problematic conditions or actions (for example, a condition about moving a ticket to a stage that does not exist anymore, or an email notification that has to be sent to a user that does not exist in this account anymore) — the rule is placed on hold automatically.
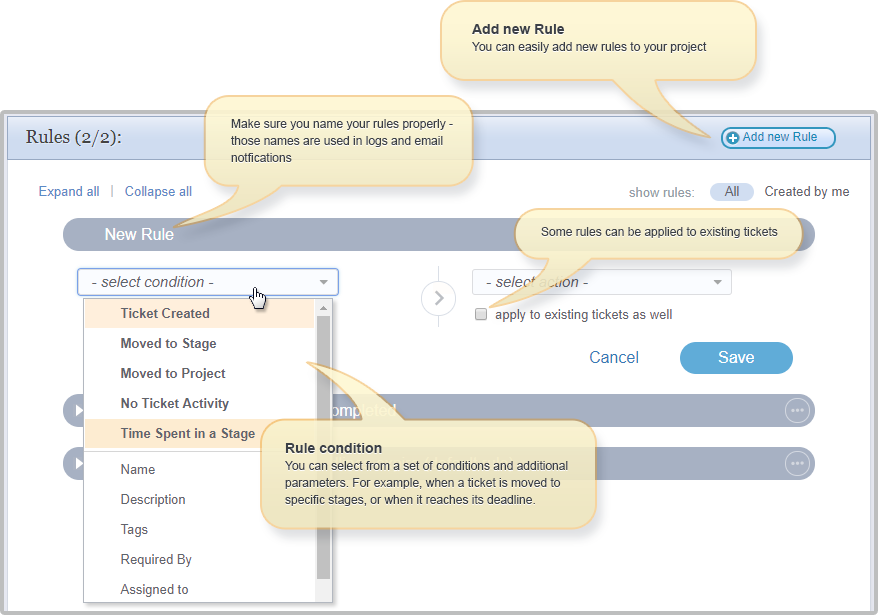
When adding/editing a rule, you have a set of conditions (triggers) to choose from:
- Ticket Created — triggers the action when a new ticket is created.
- Moved to Stage — triggers the action when a ticket is moved to a specific stage or stages.
- Moved to Project — triggers the action when a ticket is moved into this project.
- No Ticket Activity — triggers the action when there is no activity in a ticket for more than X days/months (any ticket edits, moving it between stages or posting notes into it).
- Time Spent in a Stage — triggers the action when a ticket spends more than X days/months in a specific stage or stages.
- Name, Description fields — triggers the action when this field contains certain words
- Tags field — triggers the action when this field contains certain tags
- Required by field — triggers the action when the ticket deadline is reached, is about to be reached, passed or is not set at all. The action is triggered once per day, at a certain time. It does not trigger on closed tickets (the ones located in the last column).
- Assigned to field — triggers the action when a certain person or people are assigned to the ticket, or when there is nobody assigned to the ticket.
- Ticket Archived field — triggers the action when the ticket is archived
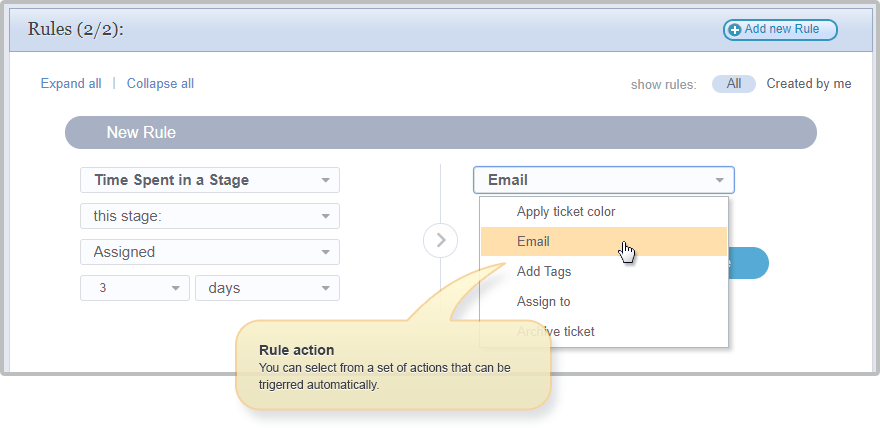
When a rule condition for a ticket is met, it triggers the rule action for that ticket.
You have a set of automated actions to choose from:
- Color Ticket — changes the ticket color (not overwriting an existing ticket color by default)
- Email — sends an email notification to the ticket creator, ticket team or specific people (multiple tickets are grouped into one email)
- Add Tags — adds tags to the ticket
- Assign to — adds people to the ticket team
- Archive Ticket — archives tickets, of course
- Star Ticket — adds or removes the color star from the ticket
- Set Deadline — sets the ticket deadline to X days/months into the future
Normally, a rule can be triggered by a ticket just once, and then it stops checking that ticket. But if the ticket has been modified, or the rule was modified — it can lead to re-triggering of the rule for this ticket again, if those changes are related to this rule. For example, a rule triggered by a ticket missing the deadline will be re-triggered by the same ticket, if that ticket deadline was modified and then later was missed again.
When creating a rule (not when editing it later), for many conditions you can select the "apply to existing tickets as well" or " apply to existing tickets retrospectively " flag to the action. It will trigger the rule for existing tickets as well, not just for the new tickets and tickets modified in the future.
Rules are executed from the security level of the rule creator. If that user does not exist, the rule is placed on hold, but can be reactivated by another user who unpauses it.
Rules are created on a project level. Only people that can edit project settings can edit its rules.
The right panel shows the Automation logs — when each rule was triggered and how many tickets were affected.
Automation is a powerful feature and can help you streamline your workflow, especially when combining multiple rules in one project. In this case the order of the rules may change the outcome, so make sure you place your rules in a correct order. You can "chain" multiple rules together to create more powerful automations.
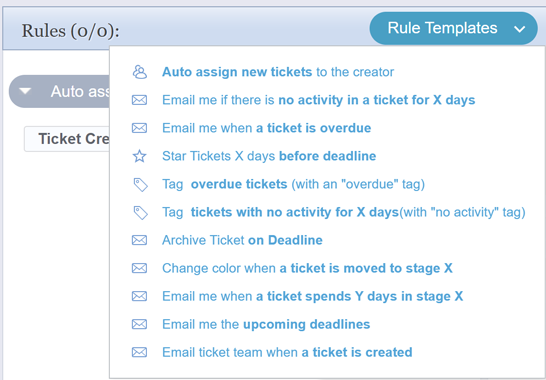
There are Rule Tremplates to choose from:
Automation Logs are also available in the List View and Dashboard (when Logs are turned on):
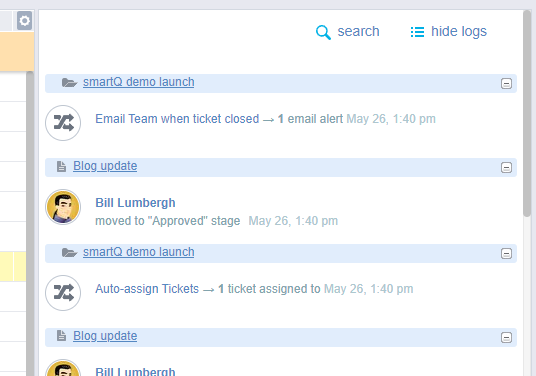
... and in the Notification Center.
Notification Center
smartQ Notification Center displays in one place the Deadline Reminders and the Automation logs:
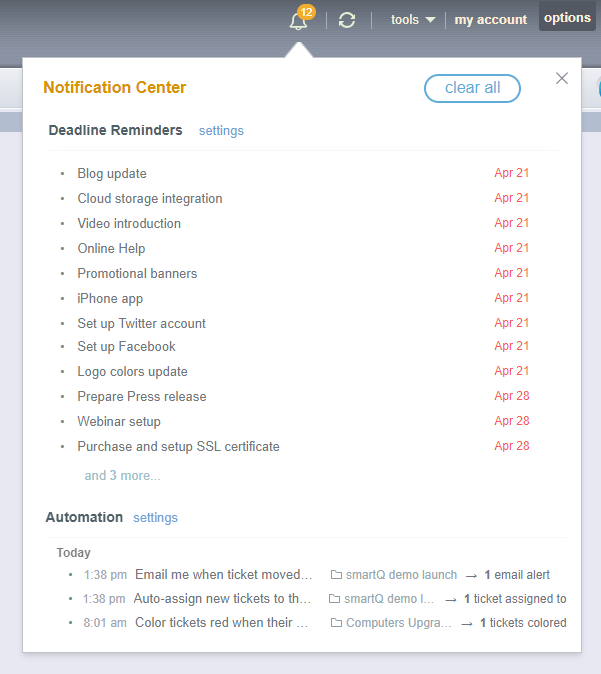
You can open it by clicking on the bell icon in the top right of your interface.
General Report
Filter tickets by multiple fields and generate ticket and project level stats.
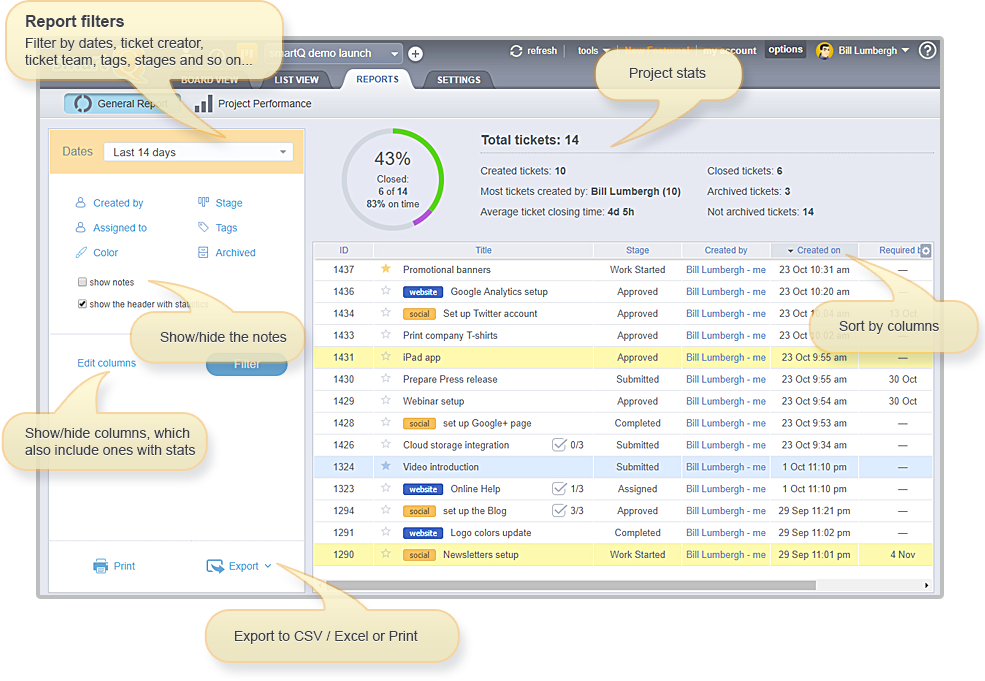
With an extended set of filters you can slice and dice your data in any way to generate custom reports. For example, the Dates range filter will display only tickets that have at least one day between their creation and "required by" dates that is within the selected date range.
Notes can also be included in the report, making it easy to create a hard copy of your tickets.
You can show/hide extra columns that contain ticket fields and stats (like ticket closing time, difference between closing and "required by" dates, and time spent in each column).
Project level stats show the overall progress and metrics like the average ticket closing time.
The report can be exported to CSV/Excel or printed out.
Project Performance Report
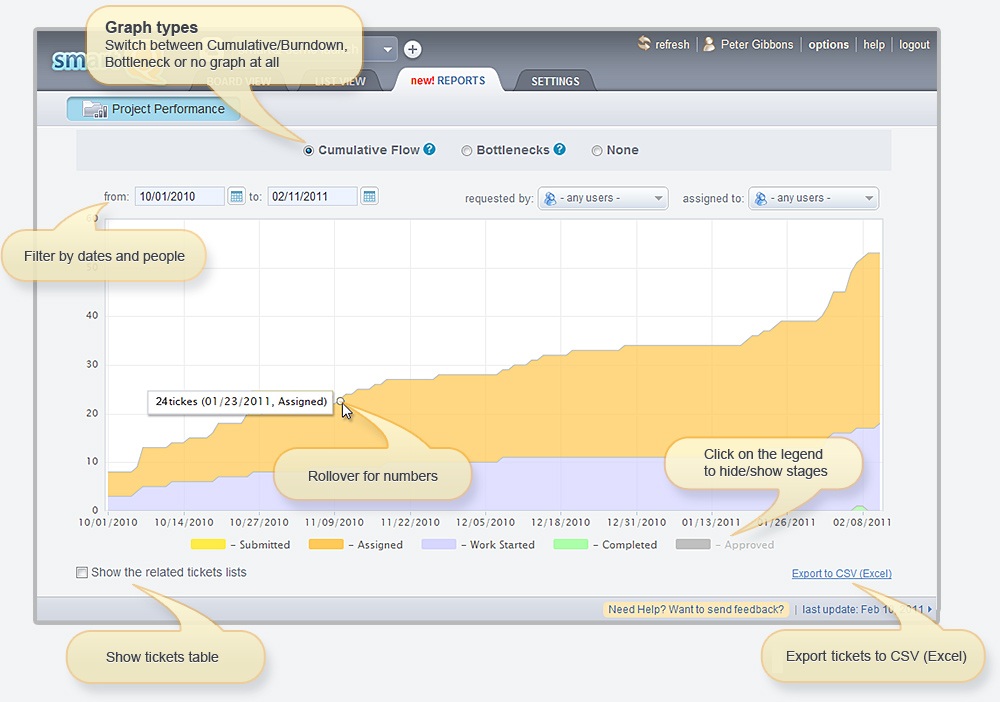
Generate Cumulative/Burndown and Bottleneck graphs, filter tickets by dates and people and export them into CSV/Excel.
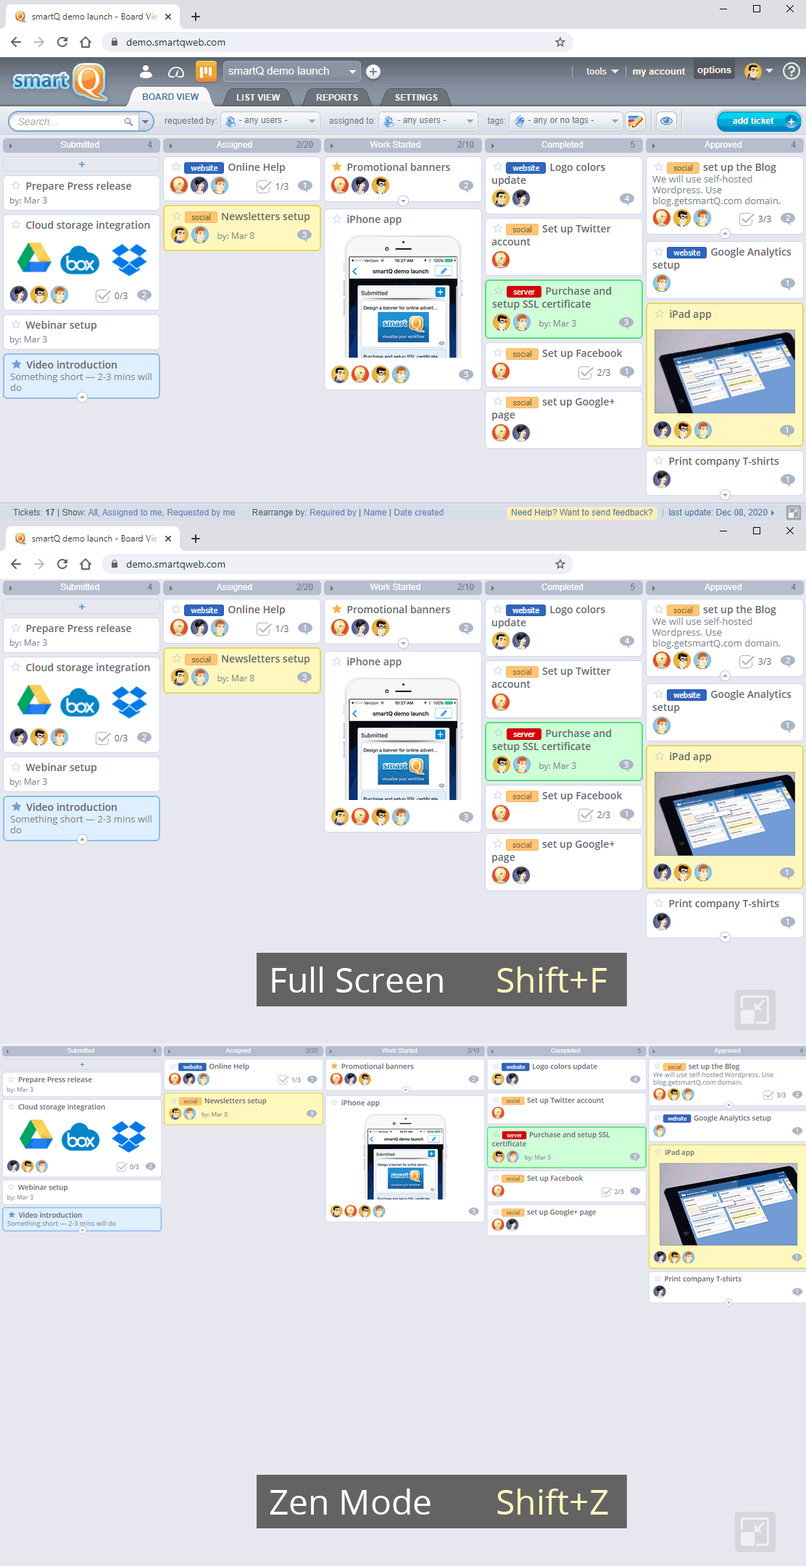
Full Screen and Zen Mode
If you have a small screen or just want to see more smartQ content at once, you can now use Full Screen (Shift + F) or Zen Mode (Shift + Z).
