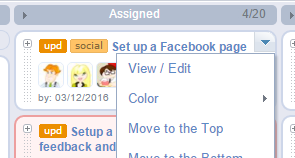
#1 Ticket menu
The ticket menu (available on mouse rollover) offers extra options, like changing ticket color, cloning or moving it to another project.
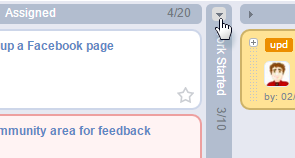
#2 Folding a column in Board View
Want to save some space in Board View? Simply fold the columns you do not need right now to hide its tickets.
Tips & Tricks
#3
Automatic deadline reminders
Get regular emails with the list of all your tickets that are due on that day (or overdue) using our Deadlines Auto-reminder.
#4
Replying to an email notification
When you are replying to a smartQ email notification your message is automatically added into smartQ as a message in the respective ticket [read more].
#5
Auto-archive
By default, tickets that end up in the last column of your board are auto-archived after a week. You can always change or turn off this feature via "options" menu.
#6
To Add new columns to the List View...
right click on the table column header. Even custom fields can be added as columns.
#7
To search tickets by other fields than just name and description...
use the dropdown menu on the search box. You can even search by text custom fields and ticket ID.
#8
Users can open Google Drive links without logging into Google...
if you set its sharing level to "Let people view without signing in".
#9
To see the ticket history...
open the Ticket View and check the "history" button on the top — it shows who created it, moved it and so on.
#10
To fit more data on the screen...
Use the F11 button to switch your web browser into full screen mode.
#11
Project/Ticket Team selector — show only selected users...
by clicking on the "selected: X" link on the bottom left of the team selector popup.
#12
Did somebody try to login into my smartQ account?
To monitor suspicious activity, like logins or login attempts from unknown locations, use Advanced Access Management and Logging.
#14
To view Archived tickets...
use List View — there is a switch there to the Archive.
#15
To export tickets...
use the Report export to CSV/Excel.
#16
To hide tags...
use button next to the tags filter dropdown.
#17
To restore a deleted ticket or note...
use User Logs or Administrator Logs.
#18
To get notified about new tickets...
use Automation to create this and other rules.
#19
To edit or delete multiple tickets...
use multi-edit in List View or Dashboard.
#20
To easily set project/board access rights...
without adding all users to the teams, simply edit the "Everybody Else" in Project Settings / Project Team — it sets the default access level for everybody not listed in other teams.
#21
To hide cover images from tickets in Board View...
simply turn them off via Options/View settings.
#22
To show custom ticket fields in Board View...
use the "Custom fields" button (the one with the "eye" icon) on the top of the board.
#23
To add an image directly from your keyboard buffer...
(from example, one taken with Print Screen button on PC) simply use CTRL+V (Command+V on a Mac) when creating or editing a Note. You can also paste images directly into Board View to create tickets with image covers.
#24
To see your tickets in a Calendar view...
#25
To add a tag to a ticket created via Quick Add...
simply add the tag name after the ticket name, with a "#" symbol in front of it (example: "Blog update #social").
#26
To make the email notifications enabled by default...
use the "Options" screen to turn those checkboxes on by default for Ticket or Note forms (Admin access required).
#27
To display unique ticket IDs...
go to Options/Main Settings (Admin access required).
#28
To limit access to your smartQ account by country, state or IP...